Latest Posts

Glorious September Days | Herrliche Septembertage

English
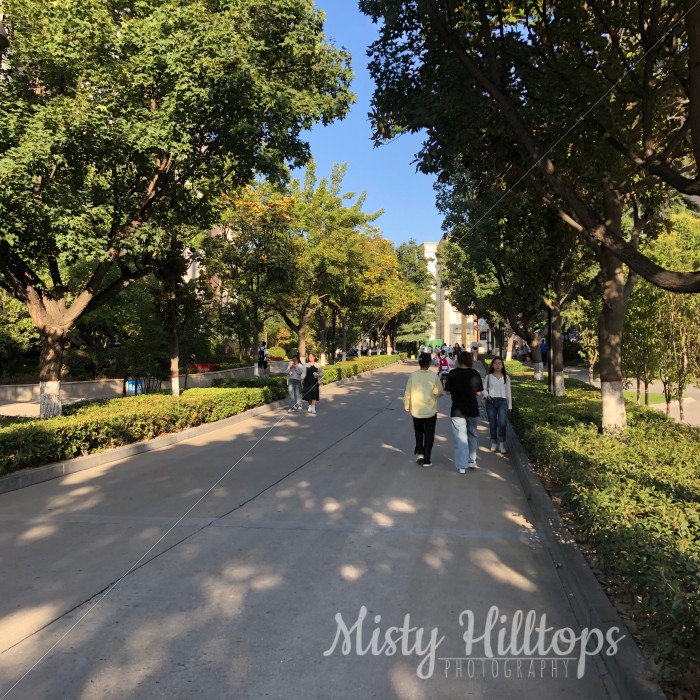
We’ve been enjoying the most glorious couple of late September days – with amazing blue skies (which is kind of rare around here), sunshine, and temperatures that slowly are beginning to be more enjoyable. And there’s finally a hint of autumn in the air, though mostly it still feels really summery.

Deutsch
Wir haben derzeit die herrlichsten Septembertage – mit tiefblauem Himmel (was hier immer noch eher rar ist), Sonnenschein, und Temperaturen, die fast ein wenig angenehm werden. Und bei allem gibt es schon erste Anzeichen daf¨ur, dass der Herbst im Kommen ist.

Mail Car | Postauto

English
Meet our school’s newest invention: the mail car. These vehicles now busily drive around campus, delivering mail to students who are willing to spend the extra cents to avoid having to go to the mailing stations. Instead, the car brings them the mail to where they request it.

Deutsch
Darf ich vorstellen? Die letzte Neuheit bei uns auf dem Campus: Das Postauto. Diese Gefährte sind jetzt überall auf dem Campus unterwegs, und liefern Post an diejenigen, die bereit sind, ein paar Cent extra zu bezahlen, um sich den Gang zur Poststation zu sparen. Stattdessen wird die Post genau dorthin geliefert, wo du sie haben möchtest.

Card Making 101: Time Flies | Kartenwerkstatt: Zeit verfliegt

Anzeige (Enthält Produktempfehlung) / Advertisement (Contains product endorsement)

English
Here comes the next card. This one is a birthday card based on the theme that time flies. I picked a paper that symbolizes time with the clock. And the butterfly flies.

Deutsch
Hier kommt die nächste Karte. Diesmal gibt es eine Geburtstagskarte, mit dem Thema: Zeit verfliegt. Dafür habe ich ein Papier gewählt, das dank der Uhren Zeit symbolisiert. Und Schmetterlinge fliegen natürlich.

Supplies

  • Origami Paper
  • Scalloped Square Die
  • Square Die
  • Birthday Stamp Set
Material

  • Origami Papier (von Aldi)
  • Qudratstanzen (einfach & mit Bogenkante)
  • Stempelset: Geburtstag

Since I was working with origami paper, it wasn’t ideal for gluing. But I loved how the papers coordinate and wanted to work with them anyway.

Offengestanden war das Papier, das ich verwendet habe nicht bestens für ein solches Projekt geeignet, da es eigentlich Origamipapier ist. Aber mir gefiel, wie das Papier aufeinander abgestimmt ist, und so habe ich es dennoch verwendet.

I began by cutting all the paper pieces and the card base. Then I stamped the butterfly and sentiment. I wanted that out of the way to give the stamps time to dry. When I stamped the sentiment, I paid attention to stamp it on the plain square so it is diagonal. Next, I fussy cut the butterfly, and then it was time to assemble the card.

Zunächst habe ich alle Papiere zurechtgeschnitten, und auch die Kartenbasis. Dann habe ich den Schmetterling und den Gruß gestempelt. Ich wollte das frühzeitig tun, damit die Stempel Zeit zum Trocknen haben. Außerdem habe ich beim Stempeln des Grußes darauf geachtet, dass das Quadrat dazu diagonal liegt. Dann habe ich den Schmetterling ausgeschnitten und es wurde Zeit, die Karte zusammenzustellen.

I began with the background. Then I glued down the strip that goes across the page. I wanted that strip to be matted. But instead of cutting one larger strip of paper from the paper, I simply cut two narrow strips which I attached beneath the top and bottom of the other paper strip.

Ich habe mit dem Hintergrund angefangen. Dann kam der Papierstreifen. Eigentlich sollte der hinterlegt sein. Aber ich wollte nicht einen großen Streifen des Papiers verschwenden, so habe ich einfach zwei kleine Streifen geschnitten, die ich dann oben und unten unter den Streifen geklebt habe.

Finally, I adhered the square with the sentiment to the scalloped square, fastened that to the card, and added the butterfly.

While the wings of the butterfly aren’t glued down, I’m aware that the pop-up effect gets lost the moment this card goes into an envelope.

Zum Schluss kam dann das Quadrat mit dem Gruß auf das Quadrat mit der Bogenkante, und das wurde dann auf die Karte geklebt. Zusammen mit dem Schmetterling.

Auch wenn die Flügel des Schmetterlings nicht angeklebt sind, damit sie eigentlich abstehen können, ist mir bewusst, dass sobald die Karte in einen Umschlag kommt, der dimensionale Effekt mehr oder weniger verloren geht.

Here is a process video of how I created this card:

Hier gibt’s noch das Video zum Ansehen:

YouTube player

And once again, this card comes with a free Silhouette/SVG cut file that you can download below.

Just remember that the Terms of Use for Misty Hilltops Designs apply.

Und wieder einmal gibt es für diese Karte eine kostenlose Silhouette/SVG Schneidedatei, die ihr unten herunterladen könnt.

Bitte beachtet nur wie immer die Nutzungsbedingungen für Misty Hilltops Designs.

September Morning | September Morgen

English
Even though it’s the end of September, you have to look hard to find signs of autumn. And that even though the locals consider this time of year very much autumn. For me, who comes from a much cooler climate that’s a bit funny. As these days still feel very much like July or August where I come from – sunny days, evenings that still barely scratch the mark where sweaters are necessary. The only difference: These days it doesn’t stay sweltering hot anymore. Though the temperature barely falls below what we consider cool.

Deutsch
Obwohl es Ende September ist, muss man genau hinschauen, um Anzeichen von Herbst zu finden. Und das obwohl die Einheimischen diese Zeit des Jahres sehr wohl als Herbst empfinden. Für jemanden, wie mich, die kühlere Lagen gewohnt sind, ist es fast amüsant. Denn zur Zeit haben wir eine Temperaturlage, die in der Heimat eher an einen perfekten Juli- oder Augusttag erinnern – sonnig und warm. Wobei die Temperaturen nachts immer noch kaum die 20 Grad Marke unterschreiten. Warum diese Temperaturen hier allerdings als herbstlich angesehen werden ist, weil es jetzt nachts nicht mehr so drückend heiss bleibt, wie im Rest des Sommers.

Tutorial: How to Make the Most of Your Silhouette Journaling Cards | Tipps zur Verwendung der Journal Karten

Anzeige (Enthält Produktempfehlung) / Advertisement (Contains product endorsement)

English
I started sharing a new generation of journal cards (more are still to come). And these cards are different from the ones I shared previously, because they are created in Silhouette Studio, rather than Photoshop.

But while they may be something to get used to, these cards are far more versatile than any other cards I ever created. In fact, I decided sharing them, because I realize I’m using these style cards far more often than the ones that come with the digital scrapbook kits – simply because I can reuse them in new styles over and over.

Deutsch
Ich habe angefangen, Journal Karten zur Verfügung zu stellen (und weitere sind bereits erstellt). Und diese Karten sind anders als die Karten, die ich bisher erstellt habe, denn anstatt sie in Photoshop zu kreieren, habe ich das im Silhouette Studio getan.

Aber während sich manche von euch erst einmal an diesen (Silhouette) Stil von Karten gewöhnen müssen, sind diese Karten sehr viel vielseitiger, als alles, was ich zuvor in dieser Richtung geschaffen habe. Persönlich habe ich gemerkt, ich greife sehr viel häufiger zu diesen Karten, als zu allen anderen Karten, die ich mit den digitalen Kits designed habe, da ich sie immer wieder in neuer verwenden kann.

From this …

… to this, …

… or this:

And to help you make the most of these cards, I decided to put together this tutorial. So, here is what you can do with these cards.

Note: At the very bottom of this post is a Video that explains some of this as well.

Und damit ihr das Meiste aus diesen Karten herausholen könnt, habe ich hier ein paar Tipps für euch zusammengetragen.

Anmerkung: Ganz unten in diesem Artikel findet ihr ein Video (englisch), dass dies auch z. T. erklärt.

1. Print & Cut from PDF
If you just want to print and trim these cards for your physical Project Life or other projects, you can do so simply with the PDF file that comes included.

1. PDF drucken & schneiden
Wenn ihr die Karten einfach nur drucken und (per Hand/Trimmer) schneiden wollt, um sie für eure Project Life Seiten oder bei anderen Projekten zu verwenden, dann könnt ihr einfach mit der PDF Datei arbeiten.

2. Digital Version
If you want to use these cards as digital product, i.e. in Photoshop, you can do so as well. Using the Magic Wand or Marquee Tool with the PDF loaded into PS, it’s easy enough to extract a high quality image of the cards onto your digital canvas.

2. Digitale Version
Wollt ihr die Karten als digitales Produkt verwenden, z. B. in Photoshop, dann könnt ihr das auch tun. Mit dem Zauberstab oder Maskenwerkzeug könnt ihr euch die Karten in PS aus der PDF ausschneiden, und dann in eurem digitalen Projekten verwenden.

But here’s where things start to be fun and interesting.

Aber an dieser Stelle wird’s interessant.

3. Fully Customizable Silhouette/SVG Version
If you want to use these cards in customizable form, you can easily do so in the Silhouette Studio software (free download, even if you don’t own a Silhouette product). (And I would assume you could do the same in whatever other apps of what electronic cutting machines are out there, though I haven’t tried other programs.)

3. Voll anpassungsfähige Silhouette/SVG Version
Wenn ihr diese Karten euren Bedürfnissen anpassen wollt, dann könnt ihr das in der Silhouette Studio App ganz leicht tun. (Übrigens steht Silhouette Studio allen kostenfrei zum Download zur Verfügung, selbst wenn ihr kein Silhouette Produkt besitzt. (Und ich nehme an, die Apps anderer Schneidegräte funktionieren ähnlich, auch wenn ich es mit anderen Apps nicht getestet habe.)

Customize Silhouette File

Silhouette Datei anpassen

Print Selection

If you want to just print a single card, or a selection instead of all, you can easily pick which cards you want in Silhouette Studio, and remove the rest from the printing canvas. (Saves print ink and paper.)

Auswahl drucken

Wenn ihr nur eine Auswahl der Karten drucken wollt, könnt ihr die Karten einfach in Silhouette Studio wählen, und die übrigen Karten vom Druckbereich entfernen. (Spart Druckerpatrone und Papier.)

Here I added other elements for print to the cards that I placed at the bottom of the paper that is to be printed.

Hier habe ich noch weitere Elemente zu den Karten hinzugefügt, die dann gedruckt werden. Die Karten sind ganz unten auf der Seite.

Important: By default, the file is set that the outlines of the card aren’t printed. (To make your cutting machine do the job of cutting.) However, if you plan on trimming this cards by hand, you can easily add a printed outline by selecting the card outline (you need to ungroup the card to only select the card outline and not modify the card as a whole). Then change the line thickness (Line Tool) to a value other than 0. I recommend a thickness 0.25, and to change the color to black (if it’s not black) to save on color ink.

Wichtig: Die Karten sind automatisch so eingerichtet, dass der Umriss der Karte nicht gedruckt wird. (Damit eure Schneidemaschine die Karten problemlos ausschneiden kann.) Aber wenn du die Karten von Hand trimmen/schneiden möchtest, kannst du ganz leicht einen gedruckten Umriss hinzufügen. Wichtig ist, dass ihr zunächst die Gruppierung der einzelnen Karte entfernt, sodass ihr nicht die gesamte Karte verändert. Dann ändert ihr die Liniendicke (Linienwerkzeug) zu einem Wert, der nicht 0 ist. (Ich empfehle eine Dicke von 0.25.) Um Farbpatrone zu sparen, sollte der Umriss schwarz gef¨arbt sein (falls er es nicht schon ist).

Recolor Parts or Entire Card

Karten Umfärben

If you want to recolor parts or the entire card to match your project, you can easily do that in Silhouette as well. (All cards are individually grouped, and items can be variously changed.)

Wenn ihr die Karten als Ganzes oder Teile davon umfärben möchtet, könnt ihr das in Silhouette auch einfach tun. (Alle Karten sind individuell gruppiert und voll anpassungsfähig.)

Simply ungroup each card you want to modify, then select the parts that you want to recolor.

Note 1: Do NOT recolor the entire grouped card. That will turn the entire card into one plain color, and all the designs become indistinguishable from the background (same color). It is very important that before you recolor anything, you UNGROUP things and select individual elements.

Note 2: Fonts and lines are different. Fonts and other elements are colored with the Color Fill Tool in Silhouette Studio.

Lines (even dotted, or dashed lines) are colored with the Line Tool.

You can recolor every element on the card – words, other elements, boxes, lines, etc.

Entfernt die Gruppierung von jeder Karte (keine Ahnung, wie das auf deutsch heißt, haha). Dann wählt die Elemente aus, die ihr neu einfärben wollt.

Anmerkung 1: Ändert auf keinen Fall die Farbe, wenn die Karte gruppiert ist. Das resultiert darin, dass die gesamte Karte zu einer Farbe reduziert wird, und alles farblich mit dem Hintergrund verschmilzt. Es ist wichtig, dass ihr immer die Gruppierung entfernt, und dann einzelne Element auswählt, bevor ihr die Karten anpasst.

Anmerkung 2: Schriftarten und Linien unterscheiden sich. Schriftarten und andere Elemente werden mit dem Farbfüll Werkzeug gefärbt.

Linien (selbst gepunktete und gestrichelte) werden mit dem Linienwerkzeug gefärbt.

Ihr könnt jedes Element der Karte färben – Worte, andere Elemente, Umrandungen, Linien, usw.

Resize Cards

Größe anpassen

If you want to resize these cards, you can also easily do so in Silhouette. (E.g. in my projects I like to use smaller than 3×4 cards, and with the Silhouette file this is easily done.)

Wenn ihr die Größe der Karten ändern wollt, könnt ihr das auch leicht in Silhouette tun. (Z.B. arbeite ich gerne mit Karten, die kleiner als die Standard 3×4 sind.)

Note how the cards above has a different size. And again, to save paper, I add more elements to my print page.

Seht, wie die Karten oben unterschiedliche Größen haben. Und, um Papier zu sparen, habe ich weitere Elemente zu der Seite hinzugefügt.

You resize tings by selecting the entire card, and then from the corner grab one of the nodes and pull them out or in. (See video below.)

Alternatively, you can use the Scale Tool to give your card a specific value for the size. (Lock the lock to ensure your card is resized proportionately.

Ihr könnt die Größe ändern, indem ihr die gesamte Karte auswählt, und dann von einer Ecke her die Karte vergrößert oder verkleinert. (Sieh Video unten.)

Alternativ könnt ihr auch das Größenwerkzeug verwenden, um euren Karten eine spezifische Größe zu geben. Wichtig ist, dass das Schloss geschlossen ist, um die Proportion der Karte zu erhalten.

Add Journaling Before Printing

Text vor dem Druck hinzufügen

One more fabulous tip:
If you don’t like your handwriting, or want to use a specific font, just, add your journaling text to the card before you print it.

Noch ein fabelhafter Tipp:
Wenn ihr eure Handschrift nicht mögt, oder eine bestimmte Schriftart verwenden möchtet, könnt ihr euren eigenen Text zu den Karten hinzufügen, bevor ihr alles druckt.

Here is another example of how I used one of the cards for a project:

Hier ist ein weiteres Beispiel, das zeigt, wie ich eine dieser Karten in einem Projekt verwende:

Note how I recolored and resized the card to fit a 6×12 layout size. With these cards, this is just as easily possible as well as just using them as is.

Seht ihr, wie ich die Karte neu eingefärbt und so verkleinert habe, dass sie auf dieses 6×12 Layout passt? Mit diesen Karten ist das genauso leicht, wie sie unverändert zu verwenden.

Video Tutorial

Here is a video tutorial explaining how you can make the most of these journal cards:

Hier gibt’s noch ein Video, das erkl¨art, wie man aus diesen Karten das Meiste herausholt:

YouTube player

School’s Out | Schulschluss

English
What a lovely day, I thought as I walked home from class today. Blue skies – a perfect September day. Most classroom buildings on campus have tiny windows that are usually obstructed by other structures, so there’s little to experience of the glorious days passing outside.

Deutsch
Was für ein herrlicher Tag, dachte ich heute auf meinem Heimweg vom Unterricht. Blauer Himmel – ein perfekter Septembertag. Die meisten Lehrsäle auf dem Campus haben nur winzige Fenster, und die meisten davon sind irgendwie baulich blockiert. So bekommt man herzlich wenig mit von den herrlichen Tagen, die draußen vorbeiziehen.

At the Park

Supplies

  • Transatlantic Travel by Carta Bella
  • Free Silhouette Sketch & Template No. 5 by Misty Hilltops Designs
  • Basic Bookmark Dies
  • Alpha Die
Anzeige (Enthält Produktempfehlung) / Advertisement (Contains product endorsement)
YouTube player

Sketch Monday: Traveler’s Notebook Sketch & Cut Template #5

Anzeige (Enthält Produktempfehlung) / Advertisement (Contains product endorsement)

English
It’s Monday, and that means I have the next sketch/template lined up for you.

This one I created for this page:

Deutsch
Es ist Montag, und das bedeutet, ich habe die nächste Ideenvorlage für euch.

Diese Vorlage wurde f¨ur diese Seite geschaffen:

At the Park

You can watch a process video of how I created this page here:

Ihr könnt euch ein Video ansehen, das zeigt, wie diese Seite entsteht:

YouTube player

I also put together a tutorial that explains how you can make the most of these sketches/templates.

Check out the tutorial HERE:

Ich habe auch eine Anleitung erstellt, die aufzeigt, wie ihr das Meiste aus diesen Vorlagen herausholen könnt.

Die Anleitung findet ihr HIER:

This Week’s Freebie | Freebie der Woche

Also, don’t forget to pick up the new set of journaling cards that I created for this week’s freebie. These cards are incredibly versatile, and can be modified to your liking.

Vergesst auch nicht, die neuen Journal Karten runterzuladen, die ich f¨ur das Freebie dieser Woche erstellt habe. Diese Karten sind ganz vielseitig, und können ganz euren Bedürfnissen angepasst werden.

I also created a video tutorial on how you can make the most of these journal cards.

Ich habe auch ein Video Tutorial erstellt, das erkl¨art, wie man das Meiste aus diesen Karten herausholt.

YouTube player

Here you can see a layout on which I used one of these journal cards:

Hier könnt ihr eine der Karten sehen, und wie ich sie auf einem meiner Layouts verwende:

Note how I recolored and resized the card to fit a 6×12 layout size. With these cards, this is just as easily possible as well as just using them as is.

Seht ihr, wie ich die Karte neu eingefärbt und so verkleinert habe, dass sie auf dieses 6×12 Layout passt? Mit diesen Karten ist das genauso leicht, wie sie unverändert zu verwenden.

Anyway, enough chatter. I know you’re impatient to get to the freebie.

As always, I’d like to remind you to respect my Terms of Use. This and any other of my freebie products are available for personal use only. You may not use it for commercial purposes. You may not re-distribute it, sell it, share it, or make available in any other way to anyone else. You may not direct link to the product on the mediafire website. If you want others to enjoy this product, please send them to this post or website. You are welcome to share about this post or website on Pinterest or via your blog and social media.
Wie immer möchte ich euch daran erinnern, meine   Nutzungsbedingungen zu respektieren. Dieses und jedes andere meiner Freebie Produkte steht euch nur für den persönlichen Gebrauch zur Verfügung. Ihr dürft es in keiner Weise kommerziell verwenden. Ihr dürft es nicht weitergeben, verkaufen, mit anderen teilen oder anderen in sonst irgendeiner Weise zur Verfügung stellen. Ihr dürft auch nicht die direkten Links zur Mediafire Webseite an andere weitergeben. Wenn ihr möchtet, dass andere in den Genuss dieses Produktes kommen, weist sie doch bitte auf diesen Artikel oder diese Webseite hin. Ihr dürft auch gerne über diesen Artikel oder diese Webseite auf Pinterest, eurem Blog oder euren Sozialen Medien posten.

Have fun with this one.

Viel Spass mit dieser Vorlage.