All posts tagged: tutorial

Silhouette: How to Accurately Print & Cut Without the Print & Cut Feature

Silhouette: Akkurates Drucken & Schneiden ohne das Druck- & Schneidewerkzeug The purpose of this tutorial is to show you how to get accurate cuts with your Silhouette cutting machine without using the Print and Cut feature. When using the Print and Cut feature, I noticed that my machine often gets the cuts quite inaccurately. But as this isn’t a regular problem, it doesn’t seem to be an issue with the alignment. So, I came up with my own way of printing and cutting, and more often than not the results are more than satisfactory for me. (Note here: I tend to be somewhat of a perfectionist, so I have high expectations of my machine to cut as close to the cut lines as can be.) Ziel dieser Anleitung ist es, zu zeigen, wie man akkurate Schnitte mit der Silhouette Schneidemaschine erzielen kann ohne das Druck- und Schneidewerkzeug. Als ich das Druck- und Schneidewerkzeug verwendet habe, habe ich bemerkt, dass meine Maschine die Schnitte oft nicht exakt hinbekommt. Aber da die Abweichungen schwanken, scheint es nicht …

Document Christmas – 5 Good Reasons to Do It & Project Christmas 2014

Dokumentiere Weihnachten – 5 Gründe dafür und das Projekt 2014     Because this is a very long blog post, here’s a quick overview of what I’ll cover. Simply scroll down to which ever section interests you most. For more inspiration, click on the Tag: December Daily. I. For Newbies II. 5 Good Reasons for Doing the December Daily III. Time for Another Round: First Considerations IV. Practical Steps: The Planning Process V. Document Christmas 2014: Here Are the Details VI. Further Links & Recommendations Da dies ein sehr langer Artikel ist, bekommt ihr hier einen schnellen Überblick. Damit könnt ihr schneller den Teil finden, der euch interessiert. Für weiter Inspiration einfach auf das Label “December Daily” klicken. I. Für diejenigen, die noch nie vom December Daily gehört haben II. 5 gute Gründe für das December Daily III. Zeit für eine weitere Runde: Erste Überlegungen IV. Praktische Schritte: Der Planungsprozess V. Dokumentiere Weihnachten 2014: Die Einzelheiten VI. Weitere Links und Empfehlungen                             …

6 Creative Ways to Use Frames on Your Layout

  Hinter den Kulissen: 6  kreative Ideen, Rahmen auf einem Layout zu benutzen   Hey scrappers! My latest tutorial was just published on Traci Reed’s blog, so instead of writing a new tutorial for this week’s post, I’d like to point you that way. It discusses six creative ways of how you can use frames on a layout and comes with lots of great inspiration. If you’re curious, go and check out the post HERE.   Hallo Scrapper! Mein neuestes How-to ist gerade auf Traci Reed’s Blog veröffentlicht worden. Anstelle also diese Woche eine neue Anleitung zu schreiben, möchte ich euch gerne darauf hinweisen. Es geht darin um sechs kreative Ideen, wie man Rahmen auf einem Layout verwenden kann. Falls es euch interessiert, könnt ihr es HIER auf Traci’s Blog finden. (Leider steht es dort nur auf Englisch zur Verfügung, aber es gibt genug Bilder, dass ihr auch so genug Inspiration bekommen könnt, falls ihr des Englischen nicht so mächtig seid!)  

10 Ways of How You Can Use the Same Photo More Than Once on a Layout – Part 2

10 Wege, wie du dasselbe Foto mehr als einmal auf deinem Layout verwenden kannst – Teil 2   Hey peeps, last week I began sharing how you can use the same photo more than once in a layout. But as there are even more ways, we’ll move right on. Here are five more ways that I found:   Hallo Freunde. Letzte Woche habe ich damit angefangen, darüber zu reden, wie man dasselbe Foto mehr als einmal auf einem Layout verwenden kann. Aber da es noch einige mehr Möglichkeiten gibt, machen wir gleich mal weiter. Hier sind noch 5 weitere Wege:     Tip 6 | Use Photo as Background and as Actual Photo Tipp 6 | Nimm das gleiche Bild für den Hintergrund und als dein Vorzeige-Foto One way that I love to use photos (and see layouts in the galleries) is when a photo is used as the background of a page. By applying various levels of opacity and merging it with the background paper, you can create a page that has a very …

10 Ways of How You Can Use the Same Photo More Than Once on a Layout – Part 1

10 Wege, wie du dasselbe Foto mehr als einmal auf deinem Layout verwenden kannst – Teil 1   Hey peeps, I’m just dropping in to share with you another quick little tutorial. Today it’s all about using the same photo more than once on a layout.   Hallo Freunde, ich schau nur mal kurz rein, um schnell ein kleines Tutorial zu posten. Heute geht es darum, dasselbe Foto mehrfach auf einem Layout zu verwenden.     Tip 1 | Use Different Sizes Tipp 1 | Verwende unterschiedliche Größen You can easily use the same photo on a layout more than once by varying the sizes. This creates an illusion that different photos are being used and prevents a layout from looking boring because of the limited choice of photos. In my example below, I only used one photo, but I used the smaller photos (cropped in different sizes, see Tip 2 below) to support the large main photo. By combining Tip 1 with Tip 2 below I led the viewer of this layout to believe …

5 {Not So} Common Tips on Making Your Cutting Mat Last

Hinter den Kulissen: 5 {nicht so gewöhnliche} Tipps damit deine Schneidematte länger hält   Tutorial Tuesday is here and I’d like to dedicate today’s post to those Silhouette owners among my readers (this post probably also applies to Cricut users and others, too). I’ve had my machine for a bit over a year now, love using it (have used it tons), and have done so many projects with it that I feel like I have a pretty good understanding of how things work. And today, I’d like to talk a little bit about the sticky mat that a lot of die cutting machines use. Now, when I first got my Cameo, one of the first things I did was scour the www to find any advice on cut settings and how to make my sticky mat last as long as possible (supplies are expensive and very very difficult for me to get). And since there’s lots of advice you can find on that topic, I’m not going to repeat most of that here. Simply do …

Behind the Scenes: Project Life Spreads that Catch Your Eye

Hinter den Kulissen: Projekt Leben Seiten, die ins Auge fallen   This year, I embarked on the journey of Project Life myself. Now, I’m a couple months down the road, and I thought to share some of the things I noticed creating PL pages that catch the eye.   Dieses Jahr habe ich mich auf die Reise mit Projekt Leben eingelassen. Jetzt habe ich schon ein paar Monate hinter mir, und ich dachte, ich könnte euch mal ein paar Dinge weitergeben, die ich gelernt habe im Bezug darauf, Seiten zu erschaffen, die ins Auge fallen.     First off, one of the greatest sources of inspiration for me is Pinterest, along with a couple of other websites such as the Studio Calico gallery, and the Two Peas in a Bucket gallery. I search those pretty much all the time when I need new ideas for my own PL pages. But as I search Pinterest, I’ve made an interesting discovery. My eye doesn’t get drawn to just about any PL page that is pinned to Pinterest. …

scrapbook layout

Behind the Scenes: Working with Patterned Background Papers

Hinter den Kulissen: Mit gemusterten Papieren arbeiten   Hey friends. After a long break I decided to start up my tutorial posts again. I’ve got a long list of things to talk about; now all I need is find the time to actually write up those tutorials.   Hallo Freunde. Nach einer langen Pause habe ich mich entschlossen, wieder damit anzufangen Scrapbook Anleitungen zu schreiben. Ich habe eine lange Liste von Dingen, über die ich sprechen möchte; jetzt muss ich nur noch die Zeit finden, diese Anleitungen zu schreiben.   Today I’d like to start simply by talking about patterned papers. While we love patterned papers (for me it’s one of the things that got me hooked on scrapbooking), some of us – especially those white space scrappers among us – can get quite intimidated to use patterned papers on the background. If anything, because it can make a page look really busy and might detract from the focal point of the page. I especially struggle with the journaling part when working with patterned backgrounds …

Freebie Friday: Autumn Word Art – Silhouette Project

Die-cutters, take heed! It’s Friday, and I have a something little special to share with you today. If you’re a proud owner of a Silhouette machine, this one’s for you! It’s a little piece of word art that would make a nice decoration for your home … What you’ll get in this freebie is a Silhouette Studio file. The words will be a little larger than you see in the Silhouette Studio preview, to fit my large frame, but you can easily resize it to meet your needs. I just used colored card stock to cut out the individual words, but you could also just print and cut. (If you print and cut, my recommendation is to offset each letter (spread the letters and words out a little more, creating more than one page) and fill that extra little bleeding space with the same color as the word. It’ll prevent to have white edges where the machine may not cut exactly at the edge of the printed character. After cutting, I adhered everything on an …

scrapbook layout, outdoors, hike

Behind the Scenes: Adding Dynamics – The Angle

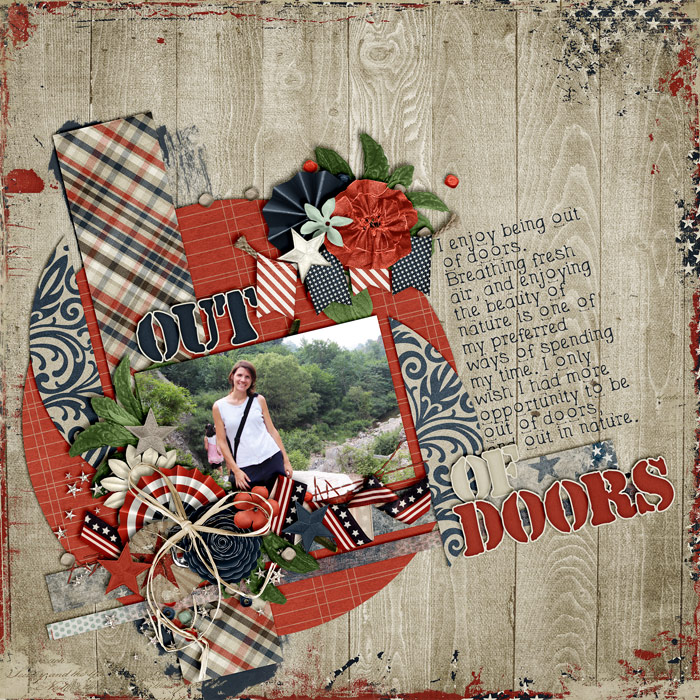
There are lots of ways how you can add dynamics to a page in order to make it visually interesting and captivating. One way of doing so is by placing things at an angle. Take a look at this page I created the other day with Libby’s new kit “We The People”: It would have just been another one of those circular layouts I’ve created lately, if it hadn’t been for the angle. The angle is what creates tension on an otherwise pretty simple page layout and composition, which makes it visually interesting. All of a sudden, the page stands out from the rest, and that is because of the angle I added.   How to Add an Angle Usually, I begin by just scrapping my page, adding paper layers and clusters, my photo(s), the title, and the journaling. If you wait with rotating everything to the very end, you save yourself a lot of guessing work and having to rotate everything individually. After creating your page, simply select all the layers you want to …