All posts tagged: DIY

greeting card, autumn

Hybrid Hub: Autumn Card #2

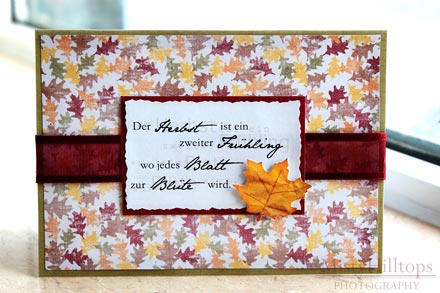
Fall is in full swing, and it’s the perfect time to show another one of my autumn cards. For this card I used the quote by A. Camus “Autumn is a second spring when every leaf is a flower.” I took the theme of that quote (leaves) and used it for the background as well as the embellishment. When creating the word art, I worked with four different kinds of fonts, but I adjusted the opacity of the words and placed them behind the main text, but just slightly off to add some more interest and dimension to it. Supplies used: Digital scrapbook papers from a blog hop last year (freebie material), white card stock, ribbon.

Monday Highlight: A Minibook of Memories

Yes, you’re right: It’s been a little quiet in my galleries recently. For one, I’ve been really busy with work and real life lately, and for another: I got inspired. “Inspired?” you ask. Yep. Another one of my inspirations. This time it’s all about minibooks. If you don’t know what I’m talking about, just hop on over to this place HERE. Take a look at this lady’s scrap-creations. In my opinion, she’s created some pretty amazing minibooks. Or THIS one. This lady, too, has lots of super fun travel books/journals that she creates. So much inspiration to look at. It actually got me thinking: I hardly ever print out photos. And wouldn’t it be fun to have a little collection of photos, memories, journaling to put together into a small photo/minibook? Well, I didn’t just think about it. I actually went ahead and did it. Or at least, I started it. Still got a lot more pages to do (and am realizing that this book probably exceeds the size that I had expected it to …

DIY: December Daily 2010

  I promised you I would keep you up-to-date with my December Daily project. Well, time got the better of me, and with all the Christmas celebrations going on, there was hardly enough time for anything at all, but I did manage to get a couple of pages done, and I’m still working on some more.   As I told you already, it is a rather interactive book – with lots of background information about Christmas. But as there is lots to discover, I hope it won’t get my readers too bored (once it’s done). Generally, I went for irregular page sizes. This makes assembling for me easy, because I don’t have to have each page matching perfectly. It has a really random feel to it and I’m glad I decided to do it that way. I’ll keep adding to the December Daily photo gallery, as I get more pages done, so make sure to come back later to check it out.

DIY: Christmas No. 4

Christmas is fast approaching, but it’s still time to get those Christmas cards out, so today I’ll bring you another how to on creating your own Christmas card. First, as always, we need to create the card (with all the mats, background papers and embellishments) in our graphic program. This card is a rather simple one, so it only has five printable parts to it: Two background mats, the base for the ribbon, the label and the snowflake. I also used a white ribbon and a piece of string. After creating and arranging the different mats and elements in photoshop, I open a new canvas where I drag and drop everything and arrange it for printing. (Always make sure on the printing canvas to have nothing overlap!) Once I’ve printed everything, cutting and assembling starts. I use white cardstock (size A5) for the base layer, fold it in half and begin to adhere the two background mats on there. The order doesn’t matter, because the ribbon will cover where the two will overlap. I measure …

101125-IMG_3412

DIY: Christmas Card No. 2

Happy Thanksgiving, fellow digi-scrappers! It’s time for the next round of our Do-It-Yourself tutorial. And since the Christmas season is right around the corner (I just realized that in some places around the world, the 1. Advent will be celebrated this Sunday), I’m going to show you how to make another Christmas card. This week’s Christmas card comes with seven parts: 2 background papers (for the base), 2 mats, 1 label, 1 embellishment, 1 string. You also will need glue (I prefer glue sticks), white  tac, and scissors. 1. Choose the papers and embellishments that you want to work with. My choice for this card was “All That’s Timeless” by Traci Reed and Meghan Mullens (available at SSD). 2. In your graphics program (I use Photoshop), open a new canvas the size of what the card will be (mine will be A6). 3. Now, with the shape tool (set to rectangle) I create four rectangles of different sizes, each on its own layer. The largest will cover the entire canvas and is the background, on …

DIY: Christmas Card No. 1

Today, I’m bringing you the first ever Do-It-Yourself tutorial on my blog! We are going to create a Christmas card and I will take you through the process step by step. Before we get started though, I should point out that being in China I don’t have access to all the wonderful craft supplies available in other places around the world, so there will be a lot of improvising, and for those with only a small budget available for their crafting, I’ll show how you can save on paper and supplies as we move along. 1. Choose a scrapbook kit or whatever papers you want to work with from your digiscrap stash. I chose “Joy to the World” by Kristin Cronin-Barrow (her Christmas kit is still available at the Sweetshoppe). 2. Open your graphic designs program and create the basic design. In my case, I decided to go with a bright background paper on which I will layer all the other papers and embellishments. I used Melissa Bennett’s “Matted” star (also SSD) to duplicate, resize …