
I have another really simple and quick tutorial for you today. When working on one of my CT pages for Libby the other day, I really wanted to use another one of those pretty papers she and Meghan had put together in their new release “Fullness of Life,” but I already had lots of papers in use, and couldn’t find how to add another one without messing up the entire page. Then a light went off! Using a template, there was still one ribbon that needed to be replaced, and I thought: Why not use that patterned paper for that ribbon? But I still wanted to make it look realistic, and really like a ribbon. Well, I thought, that’s easy peasy, just clip and apply a blending mode and that’ll do the trick. Here, take a look at my finished page:

See that ribbon with the hearts behind the photo? This is what we are going to recreate today.
In this tutorial you will learn how to …
… clip a paper to a ribbon layer;
… add a blending mode to the paper;
… merge the layers.
Here’s how it works
Step 1: Find a Suitable Ribbon
Assuming that you already opened your canvas, and have started working on your page, what you need to do now is to search your digistash for a suitable ribbon. Make sure that ribbon …
- … has a solid color (the lighter, the better; beige or light gray works best; no patterns/dots/etc.);
- … is fairly straight (unless you use a really irregularly patterned paper, then this doesn’t matter);
- … is quite broad (not very thin/narrow);
- … has a clearly visible texture to it (twill usually works great).
Open the ribbon file, and drag it onto your canvas.
Step 2: Resize Ribbon (Optional)
Next, you might want to resize your ribbon by cutting of parts of the ends and making it a little larger.

For the cutting off part, simply press M to select the Marquee tool (make sure it’s rectangular), drag your mouse over one end of the ribbon (“marching ants” should be seen now) and hit delete.

Then hit windows key + T to open the resize tool, and while holding down the shift key, drag one of the corners, until you have a nice broad piece of ribbon. I also slightly rotated my ribbon to straighten it out a bit, since my paper had a really regular pattern. (See how the ribbon doesn’t fill out the rectangle completely in the image above? A little bit of rotating made it fit nice and snug!)
Step 3: Desaturate Ribbon
Next, we need to desaturate the ribbon, so we can work with the blending later.

With your ribbon layer selected in the Layers Panel, just go to Image > Adjustments > Desaturate. This will turn your ribbon into a simple gray scale layer.
Step 4: Clip Paper
Open your paper file, and drag the desired patterned paper onto your canvas. Make sure it’s layered directly above your ribbon layer.
Clip paper to ribbon
Clip your paper to the ribbon: In the Layers Panel, hover with your mouse between the two layers you want to clip. Press the alt key, and two overlapping circles will appear. Simply click with your mouse, and you will see that the paper has taken on the shape of your ribbon.
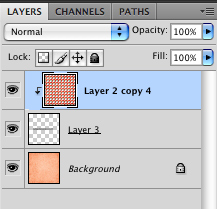
Step 5: Add Blend Mode
Still in the Layers Panel, go to the top where there is a drop-down menu for Blending Modes. It should say “Normal” right now.

Select blend mode
Click on the arrow, and all your options will appear. Depending on your ribbon and paper, you might need to try out the different settings, but for this one, I picked “Overlay.” (Usually, one or a combination of these will work: Overlay, Soft Light, Multiply, Color Burn, or Linear Burn). Now, the texture of the ribbon clearly shows through the paper. Try duplicating your paper layer (once or more) to see, if that would look even better (additional layers all need to be clipped to your ribbon).
Step 6: Merge Layers & Place Ribbon
We’re almost done! Once you have the desired effect and your paper looks like a good ribbon, go ahead and merge the ribbon/paper layers:In the Layers Panel, just select all the layers you want to merge into one, press windows key + E, and you will have one ribbon layer. Add a shadow, and place it wherever you’d like on your page.

Congrats, you’ve just created your own ribbon from a patterned paper.
Great tutorial! Super detailed, but yet not overwhelming!