
Fun with Chinglish: Silence, please!
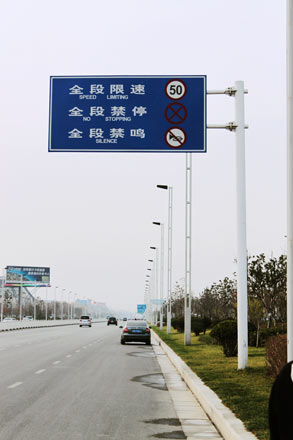
You want to use this road? Sure, just remember: once you get on it, there’s no stopping! Any complaints? Silence please! (Sign at the road to the airport; seen on our bike trip the other day.)
You want to use this road? Sure, just remember: once you get on it, there’s no stopping! Any complaints? Silence please! (Sign at the road to the airport; seen on our bike trip the other day.)
Happy Thanksgiving, everyone! I know, it’s not Thanksgiving for all of you reading my blog, neither is it actually Thanksgiving here in China (though I do get a lot of messages from my Chinese friends wishing me a happy Thanksgiving). But living in an American community, I get to celebrate this holiday and experience all the good things that come with it. I get a day off school, which makes me and my students really happy! I got to see my first ever American Football game live today, as some of my American colleagues try to continue their holiday traditions and organize a football match (the so-called “Turkey-Bowl”). I got to enjoy one of the biggest meals of the year, including a real turkey (that is making me quite sleepy right now). So, yes, there are many reasons why to be thankful for a day like today! Check out the Photo Gallery for some pics of today’s events.

Happy Thanksgiving, fellow digi-scrappers! It’s time for the next round of our Do-It-Yourself tutorial. And since the Christmas season is right around the corner (I just realized that in some places around the world, the 1. Advent will be celebrated this Sunday), I’m going to show you how to make another Christmas card. This week’s Christmas card comes with seven parts: 2 background papers (for the base), 2 mats, 1 label, 1 embellishment, 1 string. You also will need glue (I prefer glue sticks), white tac, and scissors. 1. Choose the papers and embellishments that you want to work with. My choice for this card was “All That’s Timeless” by Traci Reed and Meghan Mullens (available at SSD). 2. In your graphics program (I use Photoshop), open a new canvas the size of what the card will be (mine will be A6). 3. Now, with the shape tool (set to rectangle) I create four rectangles of different sizes, each on its own layer. The largest will cover the entire canvas and is the background, on …
Thursday: 9:00 am Turkey Bowl 12:00 pm Dinner at S. Cafe Friday: 12:00 pm Dinner at Peter Hall
Just the other day I came across a project on Ali Edwards‘ blog: the December Daily. It is an album project that documents the 25 days leading up to Christmas and I immediately fell in love with this concept. What Ali does is create 25 pages for a Christmas album. She does all the preparations for that album before December 1, so that when the month begins, she can simply enjoy the season, and keep a record of what happens every day in December. Since everything has been prepared beforehand, all she needs to do on the daily basis is add photos and journaling to her pages, and the result is a beautiful record of the Christmas season with her family. Go check out her album project from last year to get inspired HERE. For some inspiration on how to get started for this year, click HERE. As soon as I saw her albums from 2009 & 2008, I was hooked, and I wish we would commemorate the season here like they do in other …

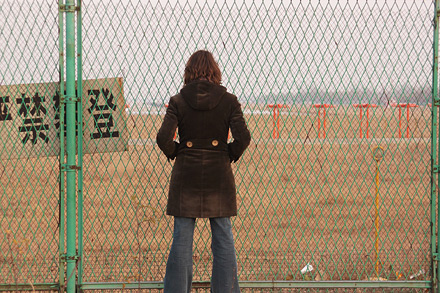
You know how people like to do bird watching? Well, we decided to do the same. Only a little more sophisticated. Ours is called “plane watching”! So, yesterday we grabbed our bikes and went for a ride … to the airport. It takes about 1 1/2 hours to get there, and first, the guys wanted to go explore the terminal. Most of them have never been on a plane, so just going to the terminal was already quite the excitement. But the real excitement came, when my friend E. and I could convince them to go to the end of the runway to watch the planes. That area is actually quite walled off, but right at the runway where the planes touch ground there is a small area with only a fence. We found that little spot (right in the “backyard” of some farmer’s land) and that’s where we settled in for “plane watching”. We were lucky to be there at “rush hour”, so the planes kept coming in. I let my friend E. play …

One of the places that doesn’t get many tourists, but is worth a visit, is Kaifeng. It has a long history, and even can boast of once having been the imperial capital of China during the Northern Song dynasty. Now, it’s mainly known for its night market when hundreds of locals flood the city center and offer all different kinds of foods to the visitor. The Dragon Pavilion One of Kaifeng’s main attractions, however, is the Imperial Garden (LongTing Gongyuan) where once the emperors of China resided. It’s near the city center and besides its extensive gardens holds several ancient buildings. Visitors can climb the stairs of its main facility, the Dragon Pavilion (Long Ting) to have a look at the throne room with some displays imitating ancient times, as well as stroll through the park. Most of the park, however is covered by lakes, and you can tour the largest one with boats which are offered right near the Dragon Pavilion. Entrance fees currently start at ¥25 per person.
I have a lot of photos from the recent China trip when my parents came to visit. And most of the time there are too many great pictures to choose from, so I usually do double pages, where on one page I feature mainly photos of events and sights, on the other page I focus on the people. So, “Little Venice” is a page where you see several photos included, and … Here’s what I did Admitted, I was lazy with this page. Usually arranging lots of photos neatly takes me a lot of time, but I wanted a quick fix, so I based my layout on a template by Erin Ink that was included in the Digi Files in September (if I remember correctly). But I only used the two background papers from that template and in place of the four smaller photos the template actually had 9 squares for clippping. So, I simply used the Control + T keys to change the format of the 9 squares by dragging the corners until I …