It’s time for our monthly photography “class,” and today I thought, I’d stay rather simple. There are many tiny and very easy steps to improve our digital photos, though they can have a great impact on our images. One of these small, but effective tools in Photoshop is the “Smart Sharpen” filter.
If you are anything like me, you already know about the process of saving your layouts for web, and that using the “Unsharp Mask” filter is part of that process. When working with photos, however, I discovered that the “Smart Sharpen” filter comes in very handy.
With just a few clicks, you can improve the image significantly, and that can also make a difference on your digiscrap layout.
Take this photo for example:
 I took this picture last weekend, and I didn’t make any adjustments. It’s a pleasant photo, but the edges of the little petals are a little blurry. Now take a look at the same image, after I applied the “Smart Sharpen” filter:
 I didn’t do anything else to this image. I only added the “Smart Sharpen” filter. Look at the petals again. They appear so crisp and clear on the second image that even an untrained eye can see the difference.
Using the “Smart Sharpen” filter, you can improve almost any kind of photograph with a snap! Only sometimes you have to be careful, for example when your photo is very grainy (maybe due to using a high ISO when you took the picture). The running the “Smart Sharpen” filter over it, can enhance the grainy appearance, and cause distraction. Generally speaking, though, I love to use the “Smart Sharpen” filter on the majority of my photos.
How to apply the “Smart Sharpen” filter
1. Before you start making any adjustments to your photos, make sure you duplicate the image (so you don’t work with the original): go to “Image” in the menu bar, and choose “Duplicate.” This will open a copy of the image in a new window.
2. Switching to the copy of your image, click on “Filter” in the menu bar, then hover over “Sharpen,” and select “Smart Sharpen” in the fly-out menu.
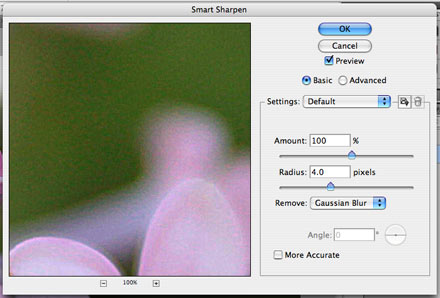
3. A new window will open, where you can make adjustments:
Usually, I set the amount at 100%, and choose a radius of 4.0. But you can also try and play around with these two settings. Depending on the grains in your image, how much detail it contains, etc. you will have to change the values. For a preview of the changes, you can zoom in or out of the image, using the “+” and “-” on the left (bottom, below image preview), to immediately see how the changes affect your image. Click “OK” when you are done. That’s it!
Again, please keep in mind that I am no pro with this. I’m just sharing my personal preferences with you, and hope it’ll help you in your memory keeping process! If you have anything you want to add to this, feel free to do so in the comments.


