Today, I have a very simple tutorial on how to recolor gray-scale items. This technique works best for papers and elements that only have different shades of the same color, or at the most have some white mixed in.
Here’s how it works …
Step 1: Duplicate
Open your element that you want to recolor. Unicolored flowers, etc. are perfect for this. Make sure you duplicate your image (never work with your original, if you want to avoid ruining it by accident): Simply go to “Image” and then “Duplicate.”
Step 2: Desaturate
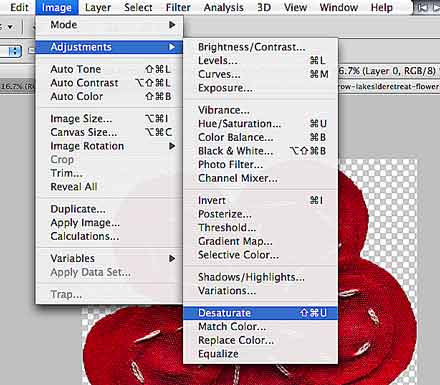
The next thing you need to do is desaturate your image: Go to “Image” again, and then “Desaturate.”
You see, I am working with a red flower that has some white stitches. (The white stitches are just border-line to work well with this technique as you can see with the end result.) Anyhow, now you are ready to change the color.
Step 3: Create New Layer & Fill with Color
Create a new layer (windows key + shift+ N), and from your layout (or whatever you are working with), with the pipette (I) pick a color of your choice. (You can also pick a color from the color palette.) With the Paint Bucket Tool (G) fill your new layer with your desired color.
Step 4: Clip Color Layer To Image
We are almost done already. Just clip your color layer to your image. (In your layer panel place your cursor between the two layers you want to clip. Press the alt key. The “clipping” symbol will appear, and you just need to click once to have your layer clipped to your image.)
Step 5: Set the Blending Mode
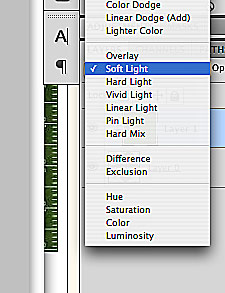
Now, all you need to do is, select a blending mode (at the top of the layers panel). Depending on the image you are working with, there are various options. Usually “Overlay” would be the right choice, but you can also try and see how the other blending options look with your image. My top choices are Overlay, Soft Light, Multiply, and even Color Burn or Linear Burn work in some cases.
In this particular case, I actually felt “Soft Light” worked best.
Step 6: Merge Layers
The last thing you need to do is simply to merge all your layers (select both the image and the color layer, and press windows key + E), and then you’re ready to drag your newly recolored element onto your layout.
Tip:
Here you can see how the green of the flower actually “spilled over” onto the white stitch (because of the different shades of the white – anything that’s not purely white will get the color from the color layer, which is why it’s best to work with uni-colored elements). In this case, however, the flower was pretty small, and on the page no one will notice. There are many elements, though that work perfectly for this technique: paper flowers, rolled flowers, fabric flowers, papers, etc. Just try and see!


